-
Warp 9 Starter Cap
Installation time 1.5 hoursTools needed:
Small Flat and #2 Phillips screwdrivers
5mm & 6mm Allen wrenches
8mm socket, 10mm, 12 mm, 17mm wrenches
(Yamabond or Permatex ultrablack)Parts needed: (these are recommended) Head pipe to cylinder head gasket 14181-22D01 Cam Chain tensioner gasket 12837-24A10 Midpipe Gasket 14771-32E00 (Click images for larger version)
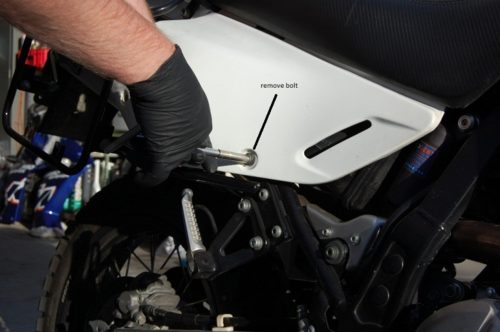
1. Remove both rear side panel by removing (1) screw or (1) bolt, per side.

2. Remove seat by removing (1) 12mm bolt on each side.

3. Remove mid-pipe heat shield on right hand side by removing (2) 8mm bolts.

4. Separate or loosen mid-pipe clamp (if applicable)(clamp would be here on some exhausts)
5. Remove head exhaust pipe by removing the (2) 6mm Allen bolts.


6. Mark clutch arm and shaft with a marker (or other). This is for reference later during reassembly.

7. Remove clutch arm by removing (1) 10mm bolt. Then gently lift up on arm with a flat blade screwdriver to remove.


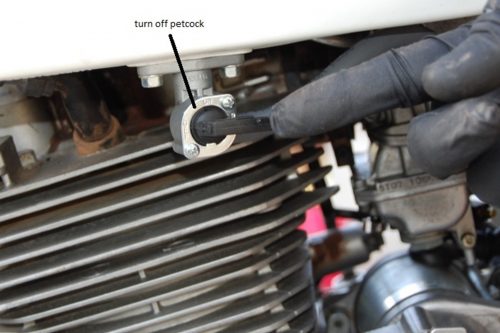
8. Turn off fuel tank petcock. Then remove fuel line from the petcock. Use a rag to catch residual fuel from line.


9. Remove fuel tank by removing (2) rear tank bolts. Then lift up on the rear of the tank and slide tank backward to remove. Set aside.


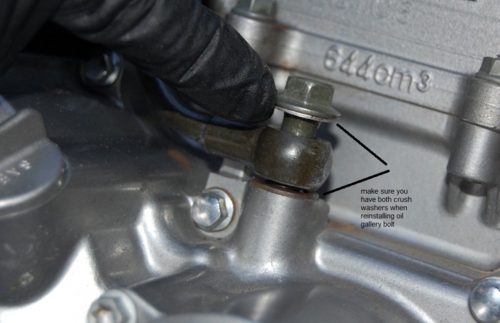
10. Remove the 17mm upper oil banjo bolt. Make sure to catch the crush washer(s).


11. Remove the 12mm lower oil banjo bolt. Make sure to catch crush washer(s).


12. Remove starter/clutch cable bracket by removing the (2) 8mm bolts.


13. Remove cam chain 10mm cover bolt. Then insert small flat blade screwdriver into cam chain tensioner and rotate the spring loaded screw clockwise until it stops/locks, the cam chain tensioner down (to remove spring tension). *WARNING! DO NOT ROLL (MOVE) BIKE OR ROTATE CRANKSHAFT IN ANY MANNER! CAM CHAIN CAN SLIP OFF OR JUMP TEETH WITHOUT TENSION!*


14. Continue removing cam chain tensioner by removing (2) 5mm Allen bolts. Remove tensioner and set aside.
*NOTE: IF THERE IS TENSION AGAINST THE BOLTS AS YOU BACK THEM OUT, THE TENSIONER IS NOT LOCKED DOWN! REPEAT PREVIOUS STEP TO LOCK DOWN CAM CHAIN TENSIONER.*15. Remove starter assembly by gently inserting a flat blade screwdriver between starter and engine case on left side.
Then pull starter up and out slightly to gain access to starter cover (on right side).

16. Remove starter cap by removing (2) 7mm bolts (long). Then gently remove starter cap. Make sure to catch shim washers (2 or 3 – typically just one thick and one thin washer). The washers should be on the shaft.


17. Install new starter cap by making sure your shim washers are on the starter shaft. Thin washer(s) go to the inside of the shaft. Thicker washer(s) go to the outside of the shaft. Then install new starter by aligning the 2 index tabs on starter cap, with the 1 index tab on the starter. *NOTE: THE NEW STARTER CAP MAY HAVE INDEX TABS IN DIFFERENT LOCATION VS THE OEM CAP. THIS IS INTENTIONAL. THIS ROTATES THE POSITIVE STARTER LUG FORWARD TOWARD THE CYLINDER. THIS ALLOWS FOR INCREASED CLEARANCE FOR THOSE RUNNING AFTERMARKET CARBERATORS.


18. Check starter cap rotation by trying to rotate clockwise and counterclockwise. A properly installed cap should only rotate slightly in either direction. If it rotates excessively, the alignment tabs are not fitted correctly. If this happens, remove the cap and realign the index tabs from previous step.
19. Check starter o-rings (2) to make sure they are seated properly. Then reinstall starter cap (2) 7mm bolts (long). Then slide starter assembly back into engine case (on left side).


20. Reinstall cam chain tensioner by making sure cam chain tensioner gasket is not damaged (or replace with new). If old gasket is intact, apply a thin layer of high temp silicone around gaskets surface. If tensioner has “popped” free. Insert screwdriver and rotate clockwise to lock it back down. (It “pops” free easily)


21. Reinstall cam chain tensioner by inserting unit into cylinder, and then install AND HAND TIGHTEN (2) 5mm Allen bolts! If tensioner has “popped” free/out, you must lock it down “again” (using flat blade screwdriver) BEFORE YOU TIGHTEN (2) ALLEN BOLTS TO CYLINDER!


22. After bolts are tightened, insert small flat blade screwdriver and rotate slightly counterclockwise to “unlock” or “free” cam chain tensioner. Then reinstall cam chain cover bolt (1) 10mm.
NOTE: DO NOT OVER TIGHTEN COVER BOLT! IT WILL BREAK!


23. Reinstall upper (1) 17mm upper oil bolt and lower (1) 12mm lower oil bolt. Make sure each oil banjo bolt has 2 crush washers (1 on each side) before installing.
*HAND TIGHTEN BOTH BOLTS FIRST BEFORE TIGHTENING TO MAKE SURE ALIGNMENT IS CORRECT.*
*DO NOT OVER TIGHTEN OIL BANJO BOLTS! THEY WILL BREAK!*

24. Reinstall clutch arm onto spline shaft by aligning index marks (made earlier). Then reinstall clutch arm (1) 10mm bolt.


25. Reinstall starter/clutch cable bracket (2) 8mm bolts.


26. Reinstall exhaust cylinder head pipe by installing new head pipe gasket (if needed) and (2) 6mm Allen bolts.
(as shown in Step 5 photos).27. Retighten mid-pipe exhaust clamp (if applicable). (As shown in Step 4 photos).
28. Reinstall mid-pipe heat shield using (2) 8mm bolts. (As shown in Step 3 photos).
29. Reinstall fuel tank by sliding tank forward then down, to rest on fuel tank frame rubbers (in photo below). Then reinstall (2) bolts or Phillips screws on rear of fuel tank. (As shown in Step 9 photos).

30. Reconnect fuel line to fuel petcock. Then turn fuel petcock to “on” position. (refer to Step 8 photos).
31. Reinstall seat using (2) 12mm bolts. (As shown in Step 2 photos).
32. Reinstall both side panel using (2) 8mm or Phillips bolts. (As shown in Step 1 photos).
33. GO RIDE! NOTE: fuel system will have to re-prime and starting make take several attempts.


